The default look of File Explorer is quite bland. It doesn’t open to our preferred folder, less frequently used features like Recent Items are enabled, the navigation pane is cluttered, and more. Today, I’ll show you how to customize File Explorer using the built-in Windows options.
Set File Explorer to Open to Your Preferred Folder
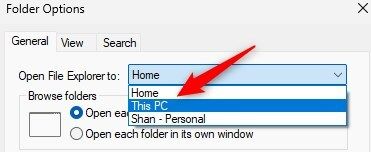
By default, File Explorer opens to the Home folder containing Quick Access, Favorites, and Recent Items sections. I wasn’t a fan of this setup because I prefer to land directly in the This PC folder, where I can easily navigate to the different partitions to find what I need. Fortunately, Windows allows you to change the default folder to which File Explorer opens.
To do this, click on the three horizontal dots on the far right of the ribbon, then select “Options.” In the drop-down menu next to “Open File Explorer To,” choose your preferred folder—in my case, the “This PC” folder. Finally, click “Apply” and then “OK.” Now, whenever you open File Explorer, it’ll take you straight to the “This PC” folder.
Remove the ‘Recent Items’ Folder
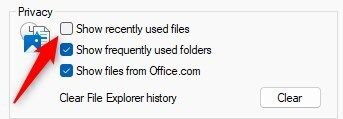
File Explorer displays recently accessed files in the Recent Items section on the Home page. This can be a privacy concern if you share your computer with others and can also clutter your File Explorer. Fortunately, Windows allows you to remove this section, and it’s one of the first things I do after a fresh Windows installation.
To remove recent items, click on the three horizontal dots on the far right of the ribbon, select “Options,” uncheck the box next to “Show Recently Used Files,” click “Apply,” and “OK.”
Stop File Explorer From Displaying Frequently Used Folders
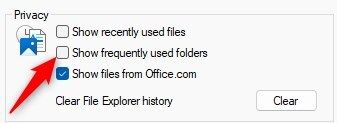
Like Recent Items, File Explorer also displays frequently used folders in the navigation pane on the left side. Although this makes it easier to access folders you often use, it can clutter the navigation pane. To keep it clean, I keep this feature turned off to stop File Explorer from displaying any extra folders.
To do this, click the three horizontal dots on the far right of the ribbon and select “Options,” uncheck the box next to “Show Frequently Used Folders.” Then, click “Apply” and “OK.”
Toggle Navigate, Preview, and Details Pane On or Off
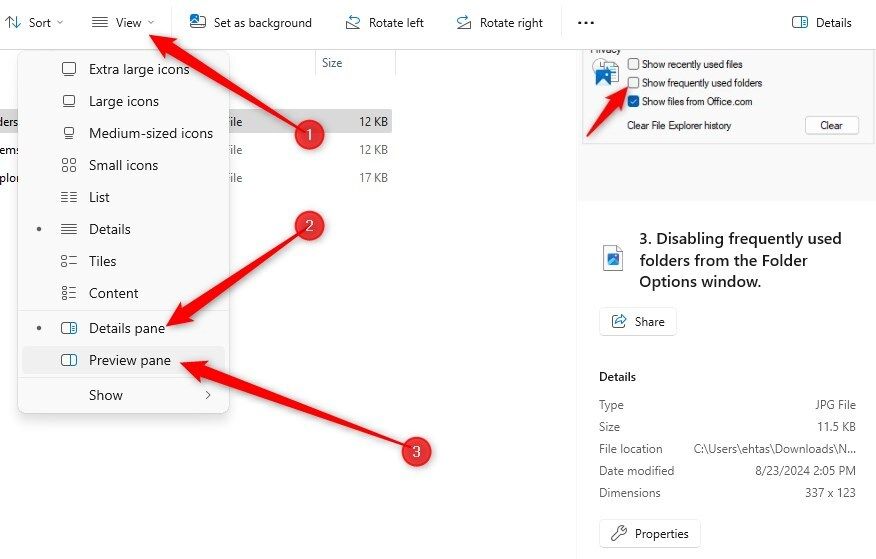
Windows offers three panes in File Explorer: the navigation pane, the preview pane, and the details pane. The navigation pane on the left sidebar allows you to easily browse through folders and is enabled by default. The preview pane lets you view a file’s content without opening it, which can save time when searching for a specific file.
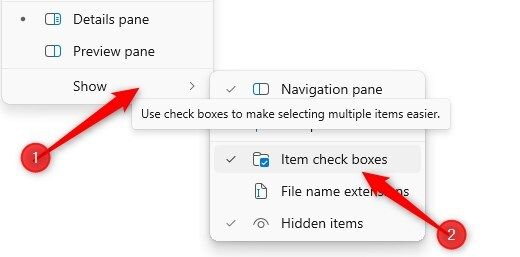
The details pane shows file information without needing to open its properties. Both the preview and details panes are turned off by default. Because the preview pane is so helpful, I always enable it on my computer. To enable the preview pane, open the “View” menu, and click the “Preview Pane” option. Now, when you select a file, you’ll see a preview on the right side.
Similarly, you can enable the details pane by clicking the “Details Pane” option to view file details easily.
Open Files and Folders With a Single Click
By default, you need to double-click on a file or folder to open it. While this isn’t a major issue, as it’s just one extra click, you can streamline navigation by configuring File Explorer to open items with a single click. I find this option particularly useful when using a mouse on my desktop computer.
To enable this feature, click the three horizontal dots on the far right of the ribbon, then select “Options.” In the General tab, select the circle next to “Single-Click to Open an Item.” Also, choose “Underline icon titles only when I point at them” to remove the underlines from file and folder names, which can disrupt the interface’s appearance.
Select Items Using Checkboxes in File Explorer
When selecting selective files to relocate or delete, we usually have to hold down the CTRL key while selecting them. I used to find this frustrating because if you accidentally release the CTRL key before finishing, selecting another file will deselect all the previous ones. So, we have to start the process again.
If you find this equally annoying, you can enable a feature that adds checkboxes next to each item, allowing you to easily select files without hassle. To enable this, go to the “View” menu and select Show > Item Check Boxes. Now, whenever you hover over an item, a checkbox will appear beside it, making it easy to select that item.
Customize Folder Icons in File Explorer
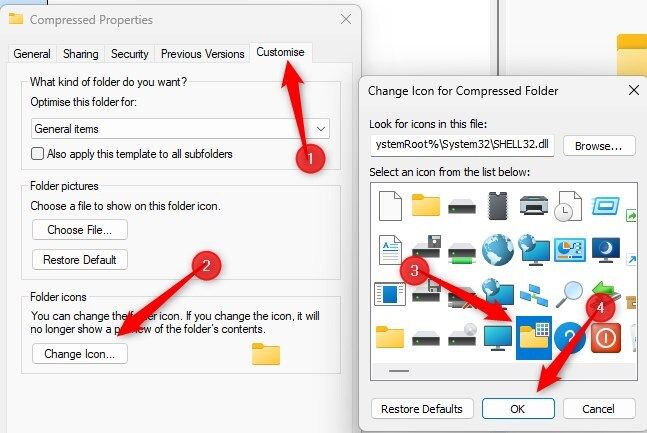
While the default folder icons in File Explorer look decent, you can make them stand out by choosing custom icons for individual folders. This improves the visual appeal of File Explorer’s interface and helps you quickly locate folders by their icons. To change a folder’s icon, right-click on the folder and select “Properties” from the context menu.
Then, go to the “Customize” tab, click the “Change Icon” button, choose your preferred icon from the list, and click “OK.” Finally, click “Apply” and then “OK.”
Pin or Unpin Folders From Quick Access
Windows has a Quick Access section in the Home page where some folders are pinned by default. You can pin frequently used folders to this section for easy access. This way, you won’t have to navigate through multiple directories to find them. To pin a folder to Quick Access, locate it in its original location, right-click on it, and choose “Pin to Quick Access.”
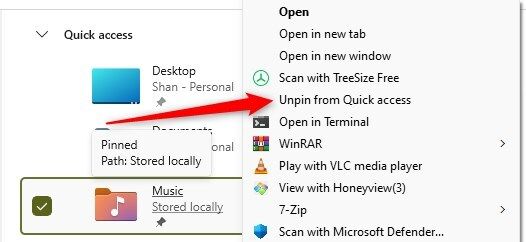
If you no longer need quick access to a folder, you can remove it. To do this, go to the “Home” tab, right-click on the folder, and select “Unpin From Quick Access.”
Switch File Explorer to Dark Mode
By default, Windows File Explorer uses light mode, which is ideal for daytime use but can be harsh on the eyes at night. To reduce eye strain, you can switch File Explorer to dark mode. To enable dark mode, right-click the Start button and select “Settings.” Go to Personalization > Colors, expand the dropdown menu next to “Choose Your Mode,” and select “Custom.”
Next, choose “Dark” from the dropdown menu next to “Choose Your Default App Mode” to apply dark mode to File Explorer while keeping the taskbar and other elements in light mode. If you prefer a whole dark mode experience, select “Dark” from the dropdown menu next to “Choose Your Default Windows Mode” as well.
These are some handy methods for customizing File Explorer in Windows. These tweaks can improve both its functionality and visual appeal. You can experiment with these options to find what suits you best. File Explorer offers many more customization features, so keep exploring and refining it further.
